


4.2. The Room Structure: Modern Room Construction
In response to rising standards of thermal insulation in the Building Regulations, and the demand for faster, cheaper construction methods, a wide variety of techniques are now in use. The relatively modern double brick cavity wall led to brick / concrete block, concrete block / concrete block and concrete block / Thermalite block constructions that have now been replaced by single wall construction using new techniques and materials. Wood frame construction is becoming more common with either timber or brick cladding. Wood frame houses are very common in other countries where, perhaps, low cost and speed of construction have been valued higher than their 'traditional' housebuilding methods of bricklaying and plastering.
Each building method has its own acoustic signature that you must accept because you can't change it. Of course, the sensible approach is to put the needs of Hi-Fi reproduction at the top of your priority list when looking for a new house! Audition each sitting room and assess it for practicality in terms of door and window placement in relation to system placement and listening position.
Concrete block cavity walls, and concrete outer / thermalite inner leaf cavity walls
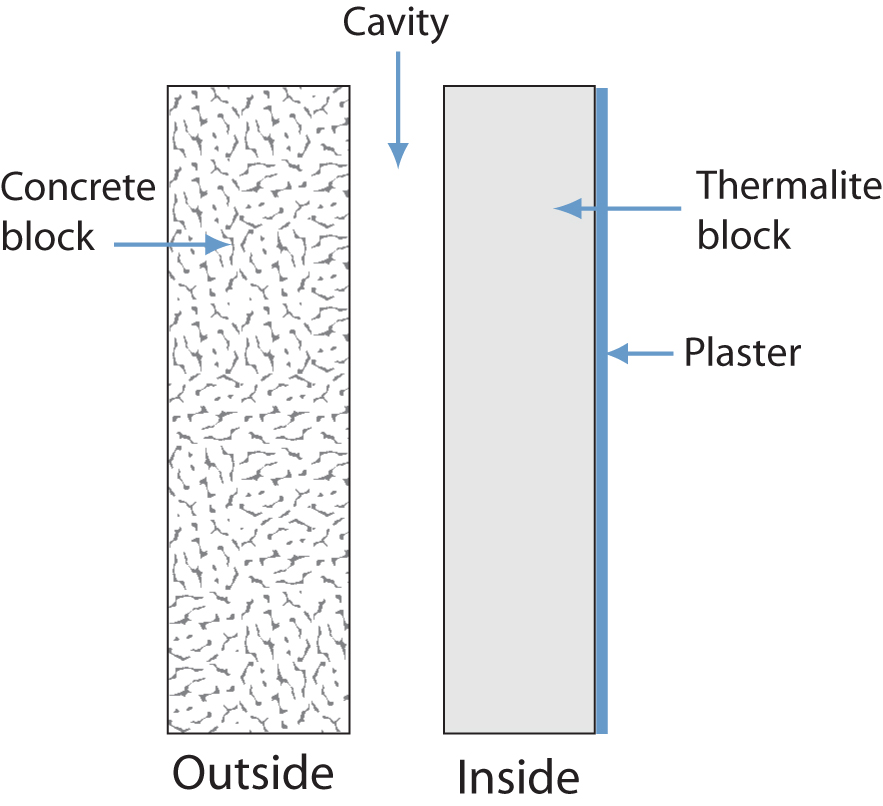
Diagram 5.9: Cross section of a concrete outer/thermalite inner leaf cavity wall.
These are merely modern versions of the traditional construction. The difference is in the acoustic character of the materials, concrete sounding much 'harder' with a more obvious nasty 'zing' to it than brick or Thermalite.
A 'concrete box' type room is very unkind to Hi-Fi systems and the more powerful they are and the bigger the speakers, the worse they sound! The secret is to use small speakers of modest power but with a very smooth (almost dull) response. The less energy you put into the room the better the sound. This principle is extremely valuable at Hi-Fi shows held in modern 'concrete box' hotels. Experienced 'old hand' exhibitors use small speakers and produce much better sounds than the enthusiastic 'young tigers' who try and impress with big speakers and mega-watt amplification.
Dry-lined walls
Often outside walls are 'dry-lined' with a wooden frame nailed to the inner block with special plaster boards nailed to the frame or more recently the plasterboards are just glued directly on the Thermalite blocks. The gaps between the boards and the nail holes are then 'repaired' with plaster and simply sanded flat. The surface is then ready for painting or wallpapering. This construction is quicker, easier and cheaper for the builder because it reduces construction time, but the acoustic results can be very variable.
The variability is caused by the relative complexity of the structure. The plasterboard on the framing acts as a 'panel resonant absorber' that absorbs low frequencies, and the gaps behind the plaster board act as 'cavity resonators' (and to really confuse the situation they rattle if not very firmly fixed).
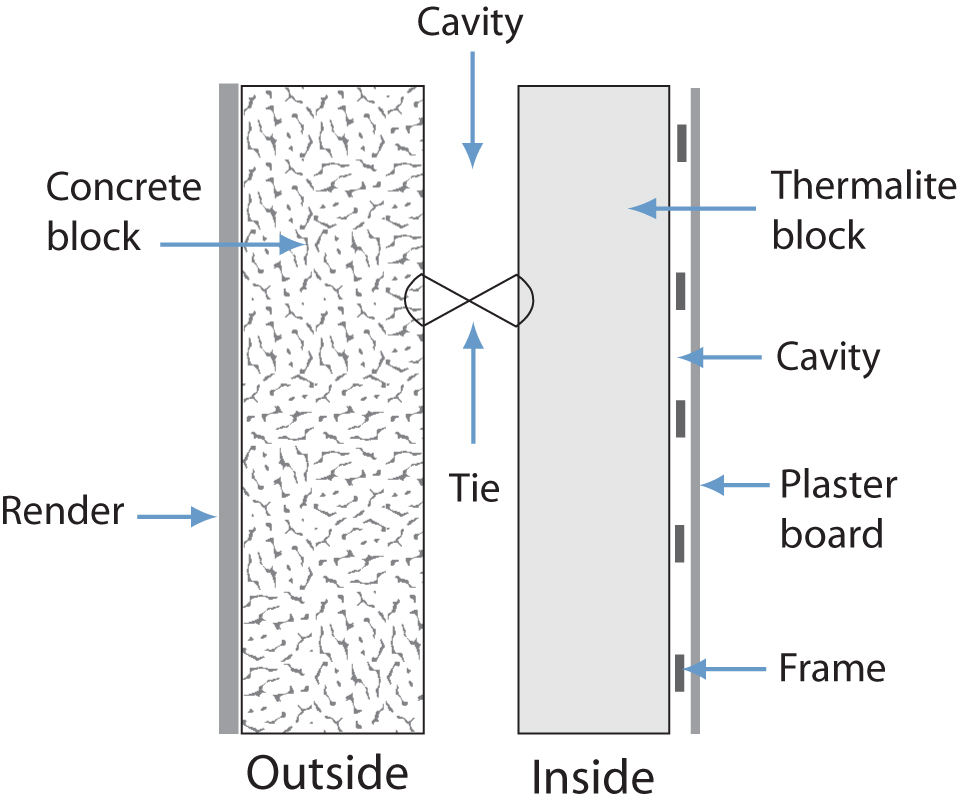
Diagram 5.10: Cross section of a dry lined wall using frame.
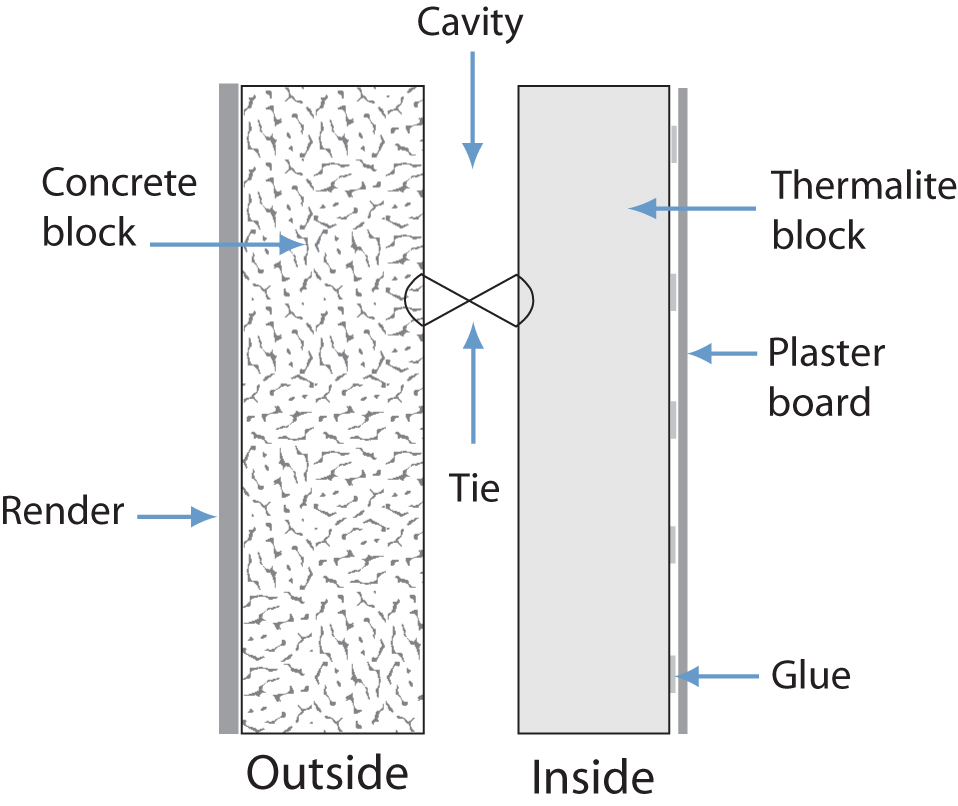
Diagram 5.11: Cross section of a dry lined wall with plasterboard glued directly to blocks.
The effect of the 'panel absorber' may or may not be a problem depending on the loudspeaker used. The loss of bass may be too much for small speakers, but it may be quite effective to control the bass boom of some large speakers. This is a speaker and room interaction problem that tends to dictate your choice of loudspeaker!
The problem can be reduced considerably, however, with the injection of structural foam into the cavities between the plasterboard and the Thermalite block - see instructions for filling the wall cavity with foam below. You may wish to wait, though, until you need to redecorate before tackling this upgrade, as you certainly will need to afterwards! (I advise caution here, because some of current 'dry lining' techniques and materials could be compromised by this method. There may, for example, be a vapour barrier or insulation that should not be penetrated, so seek the advice of an architect or good builder first. If you are buying a new house under construction, a few quid to the foreman or joiner to make sure the framing is fixed more solidly would pay dividends!)

Diagram 5.12: The frame and cavities of a dry lined wall
Instructions for filling the wall cavity with foam
You will need to buy yourself a joist detector and an electrical wiring detector. These are usually combined in one unit. You will also need a supply of large cans of structural expanding polyurethane foam filler and sealer (obtainable from DIY stores or builders merchants).
Using the 'joist' detector function, map out on the wall with a pencil the positions of the uprights and horizontals behind the plaster board. Then do the same for the electrical wiring using the wiring function. Before drilling any holes, switch off the circuit breakers to any wiring found (check again with the detectors).
Your wall 'map' will show you where all the cavities are behind the plasterboard. Now drill a hole big enough to insert the foam applicator tube (approximately 9mm diameter) in the centre of each cavity. You'll need a battery powered drill - remember you've turned off the power! Have some masking tape handy to seal each hole after using the foam, as it expands 2-3 times its volume and will ooze out of the hole again like an alien monster unless you seal it.
Squirt foam into each of the holes, putting in enough to glue the panel to the block wall behind. Use your own judgement on this - too much won't matter (except for the cost) but too little is a waste of time and effort. Remember that it expands 2-3 times its volume a few seconds after coming out of the nozzle, so I suggest that you test the expansion dynamics first on a sheet of old newspaper. Read the instructions on the can! When the foam has cured, test the wall for rattles by banging it with your fist (like you do in the Police Station or pub to get some service!).
If the wall still has rattles where the uprights are insecurely fixed to the blocks, drill further holes next to the upright where it is rattling and inject some more foam. After the foam has cured completely, you can remove the masking tape and sand the foam flat to the wall. Redecorating may now begin!
IMPORTANT NOTE: Check, of course, that there is no fibreglass damping material already filling the cavities. Before launching into any of this foam injection, do consider the effect of the dry lined wall or partition wall as a 'resonant bass absorber'. Some of that bass absorption may be beneficial although usually it is the cause of lack of bass in rooms.
Partition (or Stud) walls
They are simply built of studding (typically 2"x4" (51mm x 102mm) timber) clad in plasterboard so the same expanding foam technique as for dry-lined walls can be used to stop vibration rattles and limit low frequency absorption. Sound transmission through the wall will be reduced considerably if you fill each cavity rather than use just enough to damp the centres.


